
 Special Tools: Check Valve Removers
I'll show you three different tools that you can use to remove a lantern or stove check valve.
The first one will only cost you a perfectly good flathead screwdriver, but the chance of getting the check valve out is probably less than 50/50. The second tool will cost you about $10-$15 at the hardware store but your chances of getting it out go up to about 90%. Unfortunately, this choice has a major drawback in that it will destroy the check valve. The third tool costs about $50 delivered and will get 99.9% of them out undamaged.
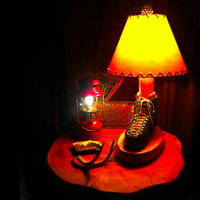
The Screwdriver Tool. The perfect flat-tip screwdriver for this job doesn't exist, but an acceptable one can be made. You'll need to grind one down so that it fits snugly in the slot on top of the check valve.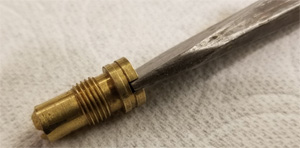
The old screwdriver in the photos is one that I ground down about 20 years ago and was my first check valve remover. I still use it to install them. It is a 3/8" x 6" screwdriver that I ground the top down on to make it fit the slot in the check valve better. It fits original vintage check valves really well but remains a bit sloppy on the new replacement type. The slot in the two vintage check valve measure very close to 7/64" while the replacement measures slightly larger at 1/8". These sizes can vary with each check valve.
Your blade cannot be any wider than 3/8" or it can damage the fount or tank. Mine ended up 11/32" wide. Insert the screwdriver down into the stove or lantern to see how much slop you have. If it feels really loose, grind about 1/16" inch off the tip and check it again. The blade on mine is 3/32" thick.
I recommend exercising patience as you only get one shot with this method. Either the soft brass check valve will come out or you will strip the slot. Spray penetrating fluid into the pump cylinder, enough to completely cover the check valve. Let it soak for hours, or days. Once you are ready, dry it out. Lower the screwdriver into the pump cylinder and carefully place the blade into the slot.
Hold the screwdriver centered in the pump cylinder and give it two or three light taps with a hammer. Don’t pound, just tap.
Now you can attempt to turn the screwdriver counterclockwise. Press down hard to keep the blade in the slot, then twist. You'll need the assistance of a plier or wrench to help you turn the screwdriver. Go slow. If it doesn’t give, try soaking it  longer.
One of two things will happen. Either the Check Valve will “pop” free or the soft brass slot will strip out and be destroyed.
If it comes out, congratulations! If not, you can try again but you’ll probably need to extract it.
The Extractor Tool. If the screwdriver trick didn't work for you, the next step is to extract the check valve. 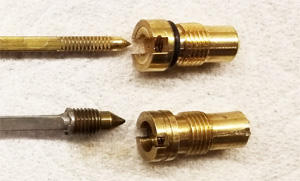
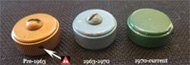
First determine which extractor you need. The photo shows a close-up of two check valves with their air stems. The size and shape of the air stem tip will tell you which extractor will work best for you. The top air stem (newer/replacement) is a straight brass rod with a pointed tip and threads while the lower one (vintage) has a large head soldered on to the brass shaft.
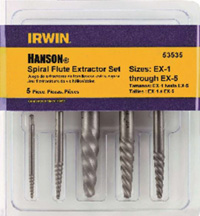 If the air stem you pull out of your lantern or stove looks like the top one, you should use a #3 extractor. If you have the larger air stem shown on the bottom, you can use a #5 extractor. The Irwin set on the left is about $15 at Ace® Hardware. Individual extractors are $5 to $7 each.
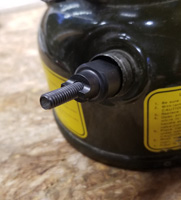
Because they're only a few inches long, you  need a second tool to grip them while you insert the tip into your pump housing. Luckily you can use a standard 3/8" drive extension from a ratchet wrench set to turn the #5 extractor. The #3 extractor is much smaller. Although you can get a T-handle tap wrench to turn it, it may not be long enough to reach the check valve. You can get the drill bit extension pictured on the right at Lowe's® for under $10. This tool has a pair of set screws in the end that will hold the smaller extractor.
Fit the extractor into the extension and then place the extractor tip down into the center hole of the check valve. Tap the extension with a wrench or hammer to give it a good bite, then turn it counterclockwise. The extractor's spiral grooves will grab the check valve and unscrew it from the fount or tank.
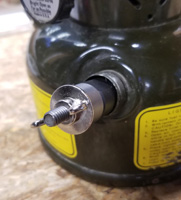
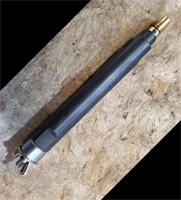
The Removal Tool. The Check Valve removal tool that I use and recommend can be purchased for about $40 from Old Coleman Parts, when they are in stock. It is an investment if you are going to work on more than one lantern or stove. The tool is basically a couple of steel rods and a double-ended bit.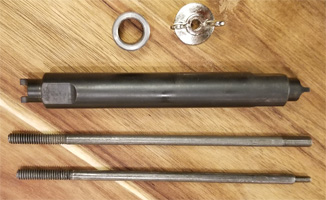
It will work with both sizes and styles of check valves. You simply slide the bit into your pump cylinder until the end sits in the slot, then insert the threaded rod and screw it into the check valve. The spacer and wingnut secures the bit to the threaded rod and the downward pressure created locks the bit into the check valve slot. Once tight, the entire unit is turned with a wrench and it pulls the check valve right out.
You can find plenty of other check valve removal tools on the web and on eBay®. I recommend Mike's tool as it is the only one I have ever used, and the quality is superior. I have no experience with the tool being made by others or those coming from Taiwan so I cannot comment on their quality.
Did you find this information useful? Click here to support the Old Town Coleman Center with a cup of coffee!
 |
 |
 |