
 Troubleshooting Pressure Losses
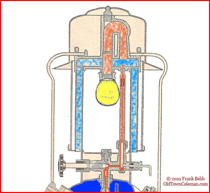
As the lantern or stove burns, pressure in the fount/tank pushes fuel to the burner. As more and more fuel is consumed and the tank empties, the appliance will naturally lose pressure. This is normal but needing to pump the appliance often indicates a leak somewhere. A lantern should run for well over an hour on a single pressurization and a stove should easily cook a complete meal.
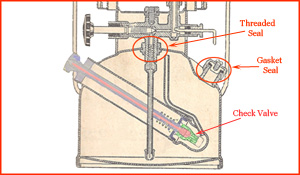 In any tank or fount, there are three holes: the fuel filler hole which is sealed by a rubber gasket, the pump plunger hole which is sealed by a check valve and the fuel valve hole which is sealed by a threaded seal. They are problematic in that order. You have the same three holes in a stove tank.
Before we go into testing, let me tell you that 99% of pressure leaks are caused by a leaking fuel filler cap.
The best way to locate a slow pressure leak is with a dunk test. Empty all the fuel from the lantern or stove and reinstall the filler cap. Give it lots and lots of pumps (50+) and turn the pump handle clockwise to "Close". Dunk it in a bucket or container of clean water. Submerge it  deep enough to cover the fuel valve. On a lantern you will want everything below the generator nut underwater. On a stove, put the entire tank underwater but keep the tip of the generator in the air. Watch carefully and look for small bubbles.
If you're not in the mood to dunk your lantern or stove, you can always spray it with soapy water. This will work but it can be difficult to identify leaks in areas where you cannot spray. You may need to remove the frame and frame rest on a lantern if you have a valve leak.
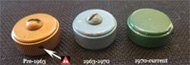
Leaks from the fuel filler hole. This is the most common reason for pressure loss and is usually caused by a deformed or dry rotted gasket in the cap. To fix it just replace it, if you can. Keep the original for display but use a new replacement cap for use. If your lantern or stove has the smaller filler cap, you have no choice but to replace it as a replacement is not available. You can learn how to do this by clicking here.
Leaks from the pump. Under the pump is the check valve and air stem. If you have bubbles coming through the hole in your pump, the check valve is leaking. One or two small bubbles is not a bad issue but a constant stream of them is. If the leak is bad you will need to clean or replace the check valve.
 Leaks from the valve. If bubbles are coming from around the valve, which is very uncommon, it was not installed properly, or it has cracked. I recommend you attempt to rotate the valve clockwise to make sure it is tight but confirm that the leak is coming from the threaded area around the valve first.
On a stove, the is fairly easy as you simply place the tank upside-down in a vice and crimp down on the square portion of the valve body, then turn. On a lantern you will need to remove the frame and frame rest to get to the valve assembly.
If you need further assistance with a leak in this area please visit the rebuilding section of the site.
Leaks from the fount. If you see bubbles anywhere on the fount, inspect the area very well to find the leak. If the integrity of the fount or tank has been compromised, set it on a shelf permanently. Under no circumstances should you ever try to fix it because one crack means there are or will be more. There is absolutely no reason to jeopardize your life or someone's you love over a lantern or stove.
If you get stuck, you can send me an email to oldtowncoleman@gmail.com, or you can post your question on our Facebook page. Good luck!
Did you find this information useful? Click here to support the Old Town Coleman Center with a cup of coffee!