

 How to Remove and Clean a Check Valve
The check valve can be a huge problem. It is very difficult to reach and nearly impossible to remove if you don't have the right tools. It is, by far, the single most difficult part to work with in a lamp, lantern or stove.
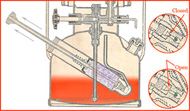
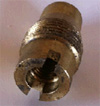 The check valve is a small brass housing that has a check ball near the bottom, about the size of a BB. The check ball moves up and down inside the housing which equates to the check valve being open or closed.
When the check valve is open, the check ball is down and air can flow into the fount from the pump. When the check valve is closed, the check ball is up and it  blocks air from leaking back out of the fount.
The common fault of check valves is for them to leak. Any foreign substance on the check ball or its seat will cause a leak, because it cannot seat properly. This can happen because of dirt, oil from the pump, or from fuel reaching it from inside the fount. It is not safe for pressure to leak from an appliance while it is burning.
With few exceptions, all Coleman® check valves are supplemented with an "air stem" which provides a second layer of protection against pressure leaks. It threads into the check valve and blocks air flow when turned fully clockwise. The air stem is turned by rotating the pump handle.
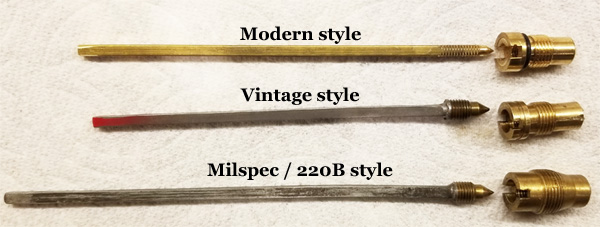
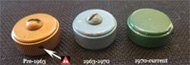
Most lanterns and stoves will have one of the check valve / air stem combinations shown above. The top one is what you'll receive if you order a new replacement, and it is also installed in most appliances made since the 1980s. The center set is original for most appliances sold between the mid-1940s and into the 1980s. The top two check valves are the same size but have different air stems. If you install a replacement check valve you must use the included replacement air stem.
The bottom check valve / air stem is from a 1940s double-mantle lantern and it is completely different in both shape and size. There is no replacement for this check valve. If you have a military lantern, a 220B/228B or a 220C/228C, please keep this in mind and don't destroy the original.
Testing the check valve. You need to have a good fuel filler cap to perform this test. Simply give your stove or lantern 20 to 25 pumps, and then press the pump all the way down but don't turn it clockwise to "Close". Lightly rest your finger on the hole in the pump handle. If it does nothing, your check valve is sealing well and you are fine. If the pump raises up on you, air is moving past the check valve and you have a problem.
How much of a problem is the next question. If the pump raises very slowly, not much is getting past the check valve and because of your air stem, you'll probably be okay. If it rises fast, it's game over. You need to clean and/or remove the check valve.
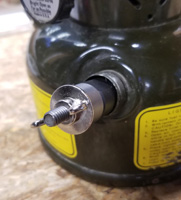
Cleaning an installed check valve. Empty all of the fuel from the lantern or stove. Once you remove the pump and air stem, you'll get a look at the check valve. The check ball and its seat are at the bottom of it and they cannot be easily reached with cleaner.
Vinegar is the first cleaner I recommend you try. Set your lantern or stove tank so that the pump cylinder is near vertical, and fill it almost full. Then insert the pump into the cylinder a little bit, just enough to push some of the vinegar past the check valve.
This will allow vinegar to get into the air inlet tube that is on the other end of the check valve and ensures that it gets to as much of the check ball and seat as possible. Allow it to sit in there for a number of hours. Wash off any vinegar that gets on the outside of your fount because it can damage the paint or nickel plate.
If you have the same issue after a long vinegar soak, you can take the next step and use CLR or Lime Away. You don't want to leave these products in your lantern or stove for more than an hour. Push it beyond the check valve again, and clean the outside of your fount immediately. When the soak it finished wash the pump cylinder well with warm water and push some into the fount to get rid of the cleaner.
Removing a check valve. I'm going to offer you three ways to remove a check valve. The first one will cost you a perfectly good flathead screwdriver and the chance of getting the check valve out is about 50%. The second way will cost you about $15 at the hardware store, but it will get about 90% of them out and will destroy every check valve it sees. The last option costs about $50 delivered and will get 99.9% of them out, and without damage.
![]() Do not attempt this unless this you have a new check valve to install. There is a very good chance that you will ruin the one in your appliance. If you do not have a replacement, I urge you to use method #3.
Do not attempt this unless this you have a new check valve to install. There is a very good chance that you will ruin the one in your appliance. If you do not have a replacement, I urge you to use method #3.
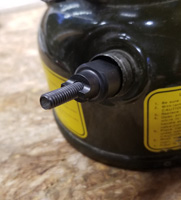
Method 1: The Screwdriver. The perfect flat-tip screwdriver for this job doesn't exist, but an acceptable one can be made. You'll need to grind one down so that it fits snugly in the slot on top of the check valve.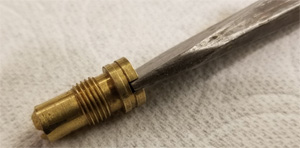
The old screwdriver in the photos is one that I ground down about 20 years ago and was my first check valve remover. I still use it to install them. It is a 3/8" x 6" screwdriver that I ground the top down on to make it fit the slot in the check valve better. It fits original vintage check valves really well but remains a bit sloppy on the new replacement type. The slot in the two vintage check valve measure very close to 7/64" while the replacement measures slightly larger at 1/8".
Your blade cannot be any wider than 3/8" or it could damage the fount or tank. Mine ended up 11/32" wide. Insert the screwdriver down into the stove or lantern to see how much slop you have. If it feels really loose, grind about 1/16" inch off the tip and check it again. The blade on mine is 3/32" thick.
You only get one shot at this; it will either come out or you will strip it. Spray penetrating fluid into the pump cylinder, enough to completely cover the check valve. Let it soak for hours, or days. Once you are ready, dry it out. Lower the screwdriver into the pump cylinder and carefully place the blade into the slot.
Hold the screwdriver centered in the pump cylinder and give it two or three light taps with a hammer. Don’t pound, just tap.
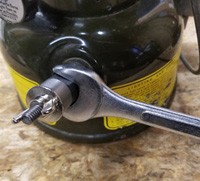
Now you can attempt to turn the screwdriver counterclockwise. Press down hard to keep the blade in the slot, then twist. You'll need the assistance of a plier or wrench to help you turn the screwdriver. Go slow. If it doesn’t give, try soaking it  longer.
One of two things will happen. Either the Check Valve will “pop” free or the soft brass slot will strip out and be destroyed.
If it comes out, congratulations! If not, you can try again but you’ll probably need to extract it.
![]() Do not attempt this unless this you have a new check valve to install. You will destroy the original using an extractor tool. If you do not have a replacement check valve, I urge you to use method #3.
Do not attempt this unless this you have a new check valve to install. You will destroy the original using an extractor tool. If you do not have a replacement check valve, I urge you to use method #3.
Method 2: The Extractor Tool. If the screwdriver trick didn't work for you, the next step is to extract the check valve. You can buy a small 5-piece set of extractors for under $20, or you can buy the one you need for 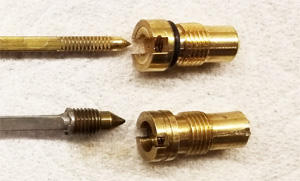 about $7.
The first step is to determine which extractor you'll need. The photo shows a close-up of two check valves and air stems. The size and shape of the air stem's tip will tell you which extractor will work best for you. The top air stem (newer/replacement) is a straight brass rod with a pointed tip and threads while the lower one (vintage) has a large head soldered on to the brass shaft.
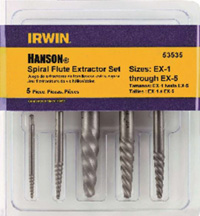 If the air stem you pull out of your lantern or stove looks like the top one, you should use a #3 extractor. If you have the larger air stem shown on the bottom you will need a #5 extractor. The Irwin set on the left can be purchased at Ace® Hardware for under $15. Individual extractors are $5 to $7 each.
Because the extractors are only a few inches long, you  need a second tool to grip them while you insert the tip into your pump housing. You can use a standard 3/8" drive extension from a ratchet wrench set to turn the #5 extractor. The #3 extractor is much smaller. You can get "drill bit extension" pictured on the right at Lowe's® for under $10. This tool has a pair of set screws in the end that will hold the smaller extractor.
Fit the extractor into the extension and then place the extractor tip down into the center hole of the check valve. Tap the extension with a wrench or hammer to give it a good bite and then turn the extension ![]() counterclockwise. The extractor's spiral grooves will grab the check valve and unscrew it from the fount or tank.
counterclockwise. The extractor's spiral grooves will grab the check valve and unscrew it from the fount or tank.
Method 3: The Removal Tool. The Check Valve removal tool that I use and recommend is made by Coleman collector Mike Wells. If you are insterested in purchasing this tool, please refer to the "Special Tools" section of this website or click here. This tool is very much a worthwhile investment if you are going to work on more than one lantern or stove. it is basically a couple of steel rods and a double-ended bit.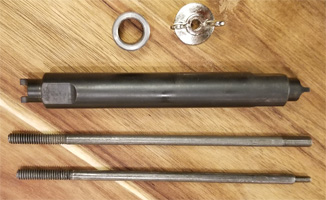
It will work with both sizes and style check valves. You simply slide the bit into your pump cylinder, insert the threaded rod and screw it into the check valve. The spacer and wingnut secure the bit and rod to the check valve. Once tight, the entire unit is turned with a wrench and it pulls the check valve right out.
 |
 |
 |
Cleaning the Check Valve. Once you have removed the check valve, cleaning is pretty easy. You can soak it in vinegar overnight and will usually do the trick. I have had great success using naval jelly on really cruddy check valves.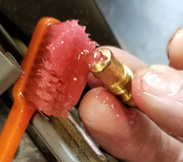
Using an old toothbrush, work the naval jelly into both ends of the check valve. Swirl it around in both ends, just to ensure that it gets all over the check ball and in the seat. Allow it to sit for an hour or so.
Rinse the Check Valve well in warm water and ensure all of the naval jelly rinses away. Hold the Check Valve to your lips and try to pass air through it in both directions. One direction should be easy but you should NOT be able to pass any air in the other direction.
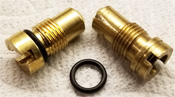 One final thought. You may have noticed that replacement check valves have an o-ring on them but the original vintage ones may not. This o-ring does a good job at sealing and if you are going to keep the original check valve, I recommend adding one. I get a fairly good match at my local Ace® Hardware store; they are 1.5mm in width, I.D of 7mm and O.D. of 10mm. They're a little thicker than original but fit tight and make a good seal. And they're made of Viton.
Did you find this information useful? Click here to support the Old Town Coleman Center with a cup of coffee!