


 Rebuilding Coleman® Double Mantle Lanterns
Chapter One: Disassembly
If you are not mechanically inclined or are not comfortable working on fueled appliances, I encourage you to send your lantern or stove back to Coleman® for repair. Click here for more information.
Access to and use of this information constitutes your agreement with our Terms and Conditions. The material presented here is for informational purposes only.
![]() My video on how to disassemble a double mantle lantern can be found here.
My video on how to disassemble a double mantle lantern can be found here.
You may see photographs of single mantle lanterns during this lesson. Some of the parts are common to all lanterns, and even stoves. Rather than take another photo I simply used one photo for multiple lessons.
1.1 Drain the old fuel. Pour the old fuel into an approved container for disposal. You can find a local hazardous waste recycling facility by doing an internet search.
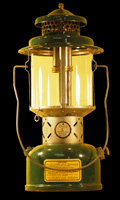
1.2 Remove the ball nut, ventilator and globe. Unscrew the ball nut from the top of the lantern and remove it. Lift off the ventilator and remove the globe. Set these parts aside. Your lantern should look like Figure 1.
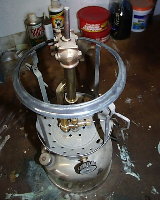 |
Figure 1 |
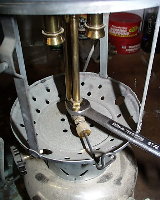
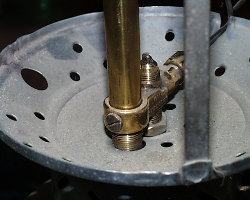
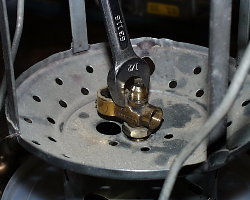
1.3 Remove the Generator. Rotate the tip cleaner stem so that it is pointing up. Place your 7/16” end wrench on the generator jamb nut and turn it counterclockwise to loosen (Figure 2). Once is it free, lift it up about an inch. Now lift the generator tube upward about ½” to expose the tip cleaner rod and eccentric block under it (Figure 3). Pull the bottom of the rod away from the eccentric block. Remove the generator with jamb nut and set them aside.
 |
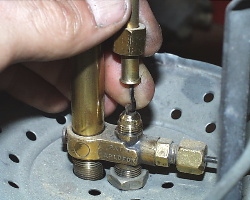 |
Figure 2 |
Figure 3 |
1.4 Remove the tip cleaner stem. Use a 3/8” end wrench on the fitting of the tip cleaner stem to the valve body. Make sure you don't place the wrench on the packing nut. Turn the stem counterclockwise to release it. Once it becomes loose, rotate to remove it from the tip cleaner body as in Figure 4. Set the tip cleaner stem aside.
1.5 Remove the eccentric block. When you removed the tip cleaner stem, it released the eccentric block and it fell inside the valve. Simply turn the lantern upside down and it will fall out. Set the eccentric block aside.
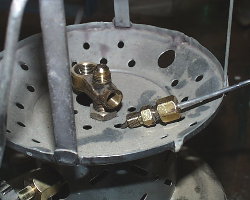 |
Figure 4 |
1.6 Remove the burner. Turn the lantern so that it is facing away from you and locate the lower set screw on the back of the tip cleaner as shown in Figure 5. Use either a flat head or cross tip screwdriver to remove this screw. It will be at an awkward angle so use caution not to strip it out. DO NOT remove the upper set screw which is on the burner head.
Soak the air intake tube and tip cleaner junction well with penetrating fluid, and allow it to soak for 15 or so minutes as you don't want dry threads when you turn the burner. Have someone hold the lantern for you or place it in a clamp. Grab the burner head and slowly rotate it counterclockwise to unscrew the air intake tube from the tip cleaner (Figure 6). If it doesn't come loose right away, rock rotate it back and forth gently. If it is just too tight, fit an adjustable wrench around one side of the burner head and turn it. Once you have the burner free, set it aside.
 |
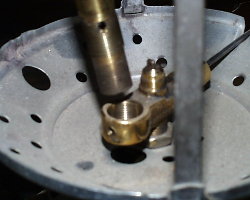 |
Figure 5 |
Figure 6 |
![]() The next few steps can scratch the paint on your lantern. If your painted fount is in good condition, you’ll want to protect it. Refer to the Special Tools section to learn how to make a tool that will do this for you.
The next few steps can scratch the paint on your lantern. If your painted fount is in good condition, you’ll want to protect it. Refer to the Special Tools section to learn how to make a tool that will do this for you.
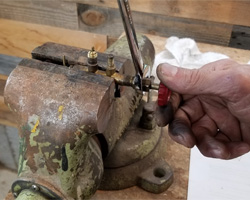
1.7 Loosen the frame nut. Locate the frame nut at the bottom-center of the frame. Use a 9/16” end wrench to turn the nut counterclockwise and loosen it (Figure 7). There is not much room for the wrench so take your time and be patient.
As soon as the gap between the frame and the frame nut gets wide enough, lift the frame rest up and insert your lid tool between the it and the fount (Figure 8). Continue turning the nut until it reaches the top of the threads.
 |
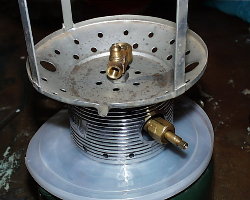 |
Figure 7 |
Figure 8 |
1.8 Remove the tip cleaner and frame. Spray the threaded area under the frame nut with penetrating fluid and allow it to sit for 30 minutes.
While you’re waiting, take a close look at it. There is a flat spot right between the threads for the generator jamb nut and the hole where the air intake tube just came out of. That is your target.
Have someone hold the lantern for you again or use a clamp to hold it. Take a 1/2" box-end wrench and place the open end down on the aforementioned flat spot, from above as shown in Figure 9. Center it well so that you don't hit the threads for the jamb nut. Now take a long screwdriver (or similar) and thread it though the box end of the 1/2" wrench. Turn the wrench counterclockwise to unscrew the tip cleaner from the valve (Figure 10). Expect it to "pop" when it comes free. Remove the tip cleaner from the frame and set it aside. Remove the frame and set it aside.
![]() Instead of the tip cleaner coming free of the valve as intended, the valve may come free of the fount. If this happens, just continue to remove the valve with frame and tip cleaner, then place it in your bench vice to separate the tip cleaner from the valve.
Instead of the tip cleaner coming free of the valve as intended, the valve may come free of the fount. If this happens, just continue to remove the valve with frame and tip cleaner, then place it in your bench vice to separate the tip cleaner from the valve.
 |
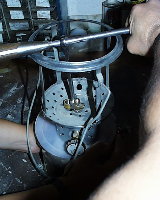 |
Figure 9 |
Figure 10 |
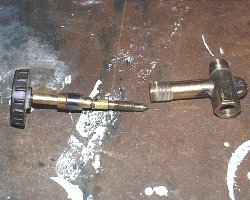
1.9 Remove the valve wheel. Use a small flat-head screwdriver to remove the screw in the center of the valve wheel. Pull the wheel off the valve stem. The direction disc sits inside of the valve wheel and the two should come apart. If they don’t, tap the wheel down on your bench until the disc comes free. Set the valve wheel, direction disc and the screw aside.
1.10 Remove the frame rest. Slide the frame rest forward on the lantern until the slot in the front clears the valve stem. Lift at the front and guide it up and away from the fount. Set it aside.
1.11 Test the check valve. If you can, now is a good time to test the function of your check valve. This is possible if the pump is working and the fuel filler cap holds pressure.
Turn the pump fully counterclockwise and give the fount 20-25 pumps. Press the pump all the way down and let go of it. Rest a finger lightly over the hole in the pump handle and see what happens. If your fount is pressurized and nothing happens, your check valve is working properly. If the pump raises your finger upward the check valve is leaking.
If it lifts your finger very slowly, you can probably get away with not removing the check valve, because the air stem is a positive stop safety for you. However, if it pushes your finger up quickly, you need to clean or remove the check valve.
1.12 Remove the valve. Turn the fount upside down and place the valve inside the jaws of your bench vise (Figure 11). Keep it level as you snug the vise down on the valve.
![]() The fount is soft and you can easily bend and/or damage it by being careless here.
The fount is soft and you can easily bend and/or damage it by being careless here.
You are going to unscrew the fount from the valve. Grab the fount firmly in both hands and gently squeeze. Slowly rotate it counterclockwise, ensuring that you stay level as you turn. Hold it close to your body, using the filler cap and pump to aid in rotating. You may have to apply some pressure to get it to turn--just make sure you don't tilt it.
Once it comes free, release the vice and unscrew the valve from the fount with your hands. When the threads are free, pull out the valve (Figure 12). Set the fount aside.
 |
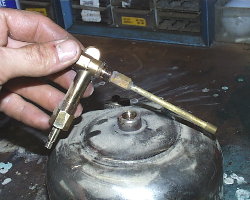 |
Figure 11 |
Figure 12 |
1.13 Remove the fuel & air tube. Hold the valve in your hand and turn the fuel & air tube counterclockwise with a 3/8” end wrench. When the threads are free, pull it down slowly so you don’t lose the metering rod and spring inside. Set the fuel & air tube aside.
1.14 Disassemble the valve. Return the valve to your vise and place the wheel back on the valve stem. Turn the wheel fully counterclockwise. Spray the stem with carburetor cleaner and then use a wire brush to clean the dirt and grease from it. Return the valve stem to its fully clockwise (closed) position.
While holding the valve wheel closed, use a 9/16” end wrench to turn the valve stem nut counterclockwise (Figure 13). Do not allow the valve stem to turn while you are doing this.
Continue turning the nut until it stops backing away from the valve body. Remove the valve wheel and set it aside. Grab the valve stem nut with your fingers and pull it off the end of the valve stem (Figure 14). If it is really tight you may need pliers to free it. Set the valve stem nut aside.
 |
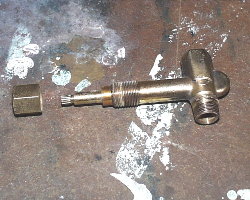 |
Figure 13 |
Figure 14 |
Place the valve wheel back on the valve stem. Turn the wheel fully counterclockwise until it stops. Grasp the wheel tightly and continue to turn counterclockwise until it moves again. This will unseat the valve stem packing from the valve.
If you are unable to free it, use a heat gun (not a propane torch) to heat the valve body. This will liquify the varnished fuel inside and allow you to remove it as shown in Figure 15.
Continue turning the stem counterclockwise until it comes free from the valve. Set the valve wheel aside.
![]()
Do not destroy the valve stem packing unless you have a new one available.
The valve stem is shown in Figure 16. From left to right you have a retainer stop, a packing retainer, the valve stem packing and a thick brass spacer.
![]() Warning: Do not attempt to remove the retainer stop.
Warning: Do not attempt to remove the retainer stop.
 |
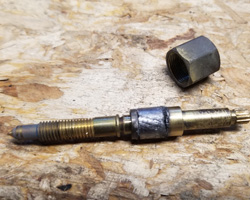 |
Figure 15 |
Figure 16 |
Hold the packing "assembly" in your fingers and pull the valve stem out. Set the stem aside.
The packing will probably stick to the retainer and/or the spacer. Try to get it free from the brass pieces as shown in Figure 17, but you may end up breaking the packing with needle-nose pliers. Set the retainer and spacer aside and discard the broken pieces of old packing.
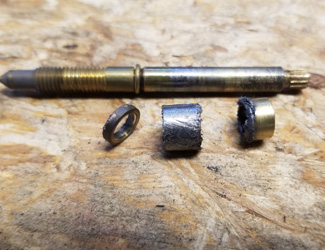 |
Figure 17 |
1.15 Remove the pump. Spin your fount around and locate the pump cap.
If your lantern has two small screws securing the pump cap, remove them with a small flat-tip screwdriver. If your lantern has a metal clip holding on the cap (Figure 18), use that small flat-tip screwdriver and carefully pry one end of the pump clip out of the hole in the cap. Firmly grasp the free end with needle-nose pliers and guide it away from the cap.
 |
Figure 18 |
Take some spray cleaner and wet the pump cap down. Allow it a minute or two to soak. Use a firm soft brush to remove the grease and oil from around the cap.
Grasp the pump handle and pull it up until you feel it reach the top. Now give it a few good upward tug to unseat the cap from the fount.
If your lantern has a cap that is threaded on, turn it counterclockwise to remove.
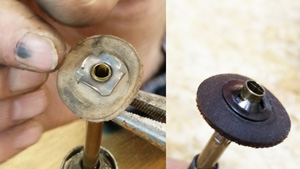
1.16 Disassemble the pump. Turn your pump upside down to see how the pump cup is being held on. You may see some variation of a hex nut, or a thin self-locking “push-on” nut (Figure 19). Also note the flat surfaces on the round pump shaft, near the bottom end. Use these flat areas to hold the pump with pliers or wrench.
If your pump is the style with a nut, use an adjustable wrench to turn it counterclockwise and remove. If it is the style with a push-on nut, place a small flat-tip screwdriver blade between the nut and the pump cup and carefully pry it off the end of the shaft. With the nut removed, remove the pump cup. Grab the outer edge of the backing plate with pliers and turn it counterclockwise to remove. You can now slide the return spring and pump cap off the pump. Set your disassembled pump aside (Figure 20).
 |
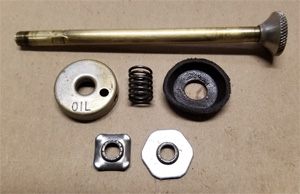 |
Figure 19 |
Figure 20 |
Inspect the condition of the leather pump cup. If it just dried out but appears to be intact, you can probably revive it. If the leather has rotted, or has torn somewhere, it needs to be replaced.
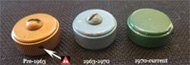
1.17 Disassemble the 3-piece fuel filler cap. I ALWAYS recommend using a new replacement cap whenever possible.
If you have an original cap that color-matches your lantern, polish it with your fount and use it for display. When you use the lantern, install a replacement cap.
Or, you can replace the insert gasket. I do not recommend this for pre-1963 non-Plamann caps with a hole in the side of the filler cap. Click here for more safety details on these caps.
Tighten the filler cap down as tight as you can with your fingers. Note the gap between the top of the cap and the bottom of the screw. Spray this junction with penetrating fluid and wipe away the excess. Allow it to sit for a few minutes.
Locate the flat tip screwdriver that best fits the center screw in your filler cap. Place the blade in the slot, aligning the screwdriver squarely down on the center screw. Apply firm downward pressure and attempt to turn the screw counterclockwise. If it comes free, remove it and set it aside.
If it seems to slip as you turn the screw, the fuel filler cap is not tight enough. Re-tighten the cap with your fingers and try turning the screw again. You can also tap lightly on the handle of your screwdriver with a wrench or small hammer a few times.
If the screw will not come out after hand-tightening three or four times, you will need to use pliers. Wrap a rag around the filler cap and gently approach it with slip-joint pliers. Be very careful and don’t scratch the fount as the jaws turn. Be gentle on the squeeze but don’t allow them to slip either.
Once you finally have the screw out, loosen the filler cap and remove it. You should find the Insert still sitting on your lantern. Pull it off and set it aside.
1.18 Remove the air stem. With the pump removed from the fount you can see the air stem down inside the pump cylinder. Use needle-nose pliers to turn it counter-clockwise until loose (Figure 21). Use your fingers to continue turning, then remove. Set the air stem aside.
 |
Figure 21 |
![]() Warning: Not all double mantle lanterns use the same check valve. Models 220B/228B and 220C/228C use check valves which are no longer available. You can purchase reproductions and I recommend you have one on-hand before removing the original.
Warning: Not all double mantle lanterns use the same check valve. Models 220B/228B and 220C/228C use check valves which are no longer available. You can purchase reproductions and I recommend you have one on-hand before removing the original.
1.19 Test and/or remove the check valve. As I stated previously, you do not want to remove the check valve unless you need to. If you were able to test the valve earlier and know that it is good, you are done.
If you were unable to test it, you can do a simple test now. Clean the outside of the pump cylinder well, the place your mouth around it (yuk!). Blow into the fount, then try to pull air out of it. If you can't pull air out, the check valve is probably working just fine. You will be testing it again during re-assembly so if you have a problem you can deal with it then.
The location of the check valve is shown in Figure 22. If you need to remove it please visit the page on how to do this.
 |
Figure 22 |
Congratulations! You’ve finished tearing down your lantern!